大家好,欢迎来到IT知识分享网。
在我们介绍了模型-视图-控制器(MVC)概念的所有三个部分之后,现在我们将讨论SAPUI5的另一个重要的结构方面。
在这一步中,我们将把所有UI资产封装在一个独立于索引的组件中。html文件。组件是SAPUI5应用程序中使用的独立且可重用的部件。无论何时访问资源,我们都将相对于组件(而不是相对于index.html)执行此操作。这种架构上的变化允许我们的应用程序在比静态索引更灵活的环境中使用。html页面,如在周围的容器中,如SAP Fiori launchpad。
Preview
An input field and a description displaying the value of the input field (No visual changes to last step)
Coding
You can view and download all files at Walkthrough – Step 9.
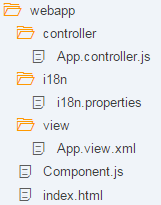
Folder Structure for this Step
在此步骤之后,您的项目结构将如图所示。我们将创建Component.js文件并修改app中的相关文件。
webapp/Component.js (New)
sap.ui.define([

   "sap/ui/core/UIComponent"

], function (UIComponent) {

   "use strict";

   return UIComponent.extend("", {


      init : function () {

         // call the init function of the parent

         UIComponent.prototype.init.apply(this, arguments);

      }

   });

});
我们创建一个初始组件。在webapp文件夹中的js文件将保存我们的应用程序设置。组件的init函数由SAPUI5在实例化组件时自动调用。我们的组件继承自基本类sap.ui.core.UIComponent,必须在重写的init方法中对基类的init函数进行超调用。
webapp/Component.js
sap.ui.define([

   "sap/ui/core/UIComponent",

   "sap/ui/model/json/JSONModel",

   "sap/ui/model/resource/ResourceModel"

], function (UIComponent, JSONModel, ResourceModel) {

   "use strict";

   return UIComponent.extend("sap.ui.demo.walkthrough.Component", {

      metadata : {

         rootView: {

            "viewName": "sap.ui.demo.walkthrough.view.App",

            "type": "XML",

            "async": true,

            "id": "app"

         }

      },

      init : function () {

         // call the init function of the parent

         UIComponent.prototype.init.apply(this, arguments);

         // set data model

         var oData = {

            recipient : {

               name : "World"

            }

         };

         var oModel = new JSONModel(oData);

         this.setModel(oModel);


         // set i18n model

         var i18nModel = new ResourceModel({

            bundleName : "sap.ui.demo.walkthrough.i18n.i18n"

         });

         this.setModel(i18nModel, "i18n");

      }

   });

});
在init函数中,我们实例化了数据模型和i18n模型,就像以前在app控制器中所做的那样。请注意,模型是直接在组件上设置的,而不是在组件的根视图上设置的。但是,由于嵌套控件会自动从其父控件继承模型,因此模型也可以在视图中使用。该Component.js文件现在由两部分组成:新的元数据部分定义了对根视图的引用,以及前面介绍的初始化组件时调用的init函数。正如我们之前所做的,而不是直接在index.html中显示根视图。组件现在将管理app视图的显示。
webapp/controller/App.controller.js
sap.ui.define([

   "sap/ui/core/mvc/Controller",

   "sap/m/MessageToast"

], function (Controller, MessageToast) {

   "use strict";

   return Controller.extend("sap.ui.demo.walkthrough.controller.App", {

      onShowHello : function () {

         // read msg from i18n model

         var oBundle = this.getView().getModel("i18n").getResourceBundle();

         var sRecipient = this.getView().getModel().getProperty("/recipient/name");

         var sMsg = oBundle.getText("helloMsg", [sRecipient]);

         // show message

         MessageToast.show(sMsg);

      }

   });

});
删除onInit函数和所需模块;这现在在组件中完成。现在您已经看到了上面显示的代码。
webapp/index.html
<!DOCTYPE html>

<html>

   <head>

      <meta http-equiv="X-UA-Compatible" content="IE=edge">

      <meta charset="utf-8">

      <title>Walkthrough</title>

      <script

         id="sap-ui-bootstrap"

         src="/resources/sap-ui-core.js"

         data-sap-ui-theme="sap_belize"

         data-sap-ui-libs="sap.m"

         data-sap-ui-bindingSyntax="complex"

         data-sap-ui-compatVersion="edge"

         data-sap-ui-preload="async"

         data-sap-ui-resourceroots='{

            "sap.ui.demo.walkthrough": "./"

         }' >

      </script>

      <script>

         sap.ui.getCore().attachInit(function () {

            new sap.ui.core.ComponentContainer({

         name: "sap.ui.demo.walkthrough",

         settings : {

            id : "walkthrough"

         }

            }).placeAt("content");


         });

      </script>

   </head>

   <body class="sapUiBody" id="content">

   </body>

</html>
Conventions
在索引页上,我们现在实例化组件,而不是应用程序视图。辅助方法sap.ui.core.ComponentContainer通过搜索组件实例化组件。作为参数传入的名称空间中的js文件。组件自动加载我们在上面定义的根视图并显示它。如果现在调用index.html文件,应用程序应该仍然看起来一样,但现在被打包成一个UI组件.
▪组件名为component .js。
▪组件与应用程序的所有UI资产一起位于webapp文件夹中。
▪index.html文件被有效地使用,它位于webapp文件夹中。
Parent topic: Walkthrough
Previous: Step 8: Translatable Texts
Next: Step 10: Descriptor for Applications
Related Information
Components
API Reference:sap.ui.core.mvc.ViewType
Samples:sap.ui.core.mvc.ViewType
免责声明:本站所有文章内容,图片,视频等均是来源于用户投稿和互联网及文摘转载整编而成,不代表本站观点,不承担相关法律责任。其著作权各归其原作者或其出版社所有。如发现本站有涉嫌抄袭侵权/违法违规的内容,侵犯到您的权益,请在线联系站长,一经查实,本站将立刻删除。 本文来自网络,若有侵权,请联系删除,如若转载,请注明出处:https://yundeesoft.com/32734.html


