大家好,欢迎来到IT知识分享网。
目录
1.创建新的Winform工程
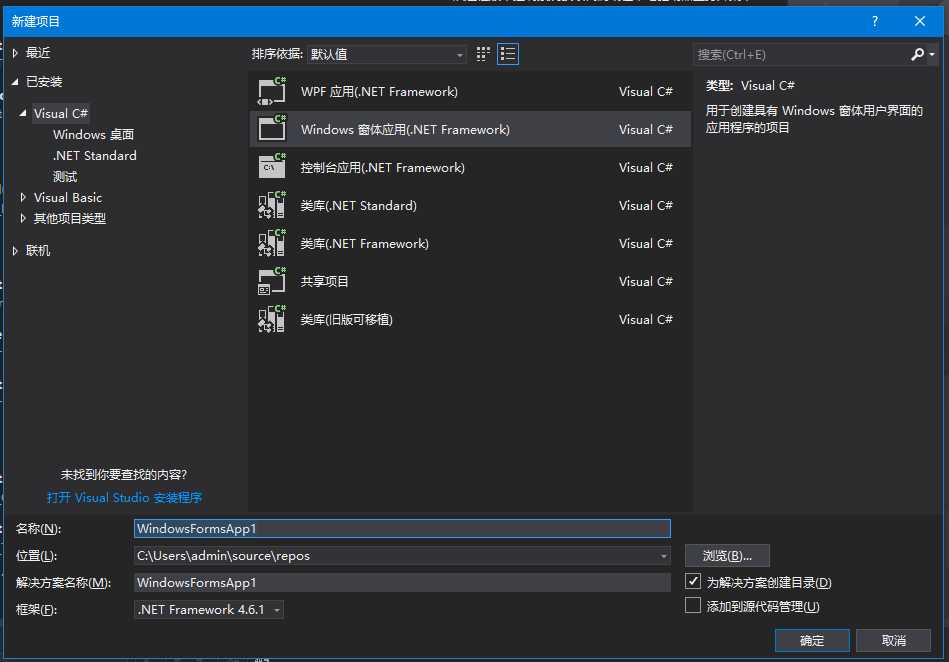
打开VS新建窗体应用就可以了,起个名字,设置路径
创建完毕后,会有一个Program.cs的脚本文件,这里的Main为入口函数。
2.窗体编辑
2.1 主窗口
单击顶条区域,右侧弹出对应的属性栏。接下来只介绍几个常用的设置,其他各位可以自行去了解。
若没有属性窗口,可在视图->属性中打开。
窗口样式 -> Icon:设置工具的icon。
窗口样式 -> MainMenuStrip: 关联右键菜单(右键菜单的使用后面详解)。
设计 -> Name: 本工具的脚本名(Program)
外观 -> 这里面是设置一些显示相关的东西
外观 -> Text: 设置本工具的名字
2.2 工具箱
工具箱里面包含所有windows窗体控件。若没有此窗口,可在视图->工具箱中打开
接下来介绍几款常用的控件:(使用方法在后面介绍)
Label:文本框
Button:按钮控件
CheckBox:勾选框
ComboBox:选择框
ContextMenuStrip:菜单栏
TreeView:树视图控件
ProgressBar:进度条
BackgroundWorker:异步操作组件
TextBox:输入框
DataGridView:网格
3.工具开发
大概功能熟悉完毕,我们就开始开发了。
3.1 一些通用属性
先介绍一些控件中常用的通用属性
Name:获取或设置控件的名称。
Enabled:获取或设置一个值,该值指示控件是否可以对用户交互作出响应。
Visible:获取或设置一个值,该值指示是否显示该控件及其所有子控件。
Size:获取或设置控件的高度和宽度。
3.2 Label
label比较简单,直接修改控件上的外观->Text即可,文本框就会显示对应的文字。
双击控件会自动注册并生成点击事件。
当然有需要也可以自己去注册其他事件。
this.label.Click += new System.EventHandler(this.label_Click);

private void label_Click(object sender, EventArgs e)
{
    MessageBox.Show("点击文本框");
}
3.3 Button
该控件用来注册点击事件。
按钮上的文字可通过外观->Text修改。
双击控件会自动注册并生成点击事件。
this.m_beginBtn.Click += new System.EventHandler(this.m_beginBtn_Click);

private void m_beginBtn_Click(object sender, EventArgs e)
{
    MessageBox.Show("点击按钮");
}
MessageBox.Show( “字符串” );//这个方法会弹出一个提醒框
3.4 CheckBox
该控件用来注册勾选框事件。
按钮上的文字可通过外观->Text修改。
双击控件会自动注册并生成 监听值变化的事件。
this.m_showAll.CheckedChanged += new System.EventHandler(this.m_showAll_CheckedChanged);

private void m_showAll_CheckedChanged(object sender, EventArgs e)
{
    Message.Box("勾选框的值改变了!当前选中状态:"+m_showAll.Checked.ToString() );
    //m_showAll.Checked 获取或设置一个值,该值指示是否 System.Windows.Forms.CheckBox 处于选中状态。
}
3.5 ComboBox
代码填充选项枚举:
public enum SelectFileModeEnum
{
    [Description("选择文件")]
    SelectFiles,  //选择文件模式
    [Description("选择文件夹")]
    SelectFolder,//选择文件夹模式
}
//获取枚举描述
private string GetEnumDescription<T>(T obj)
{
    var type = obj.GetType();
    FieldInfo field = type.GetField(Enum.GetName(type, obj));
    DescriptionAttribute desAttr = Attribute.GetCustomAttribute(field, typeof(DescriptionAttribute)) as DescriptionAttribute;
    if (desAttr == null)
        return string.Empty;
    return desAttr.Description;
}
private void FillComboBox()
{
    //将SelectFileModeEnum枚举添加到选择框
    foreach (SelectFileModeEnum mode in Enum.GetValues(typeof(SelectFileModeEnum)))
    {
        string strMode = GetEnumDescription(mode);
        m_selectFileMode.Items.Add(strMode);//填充选择框内容
    }
}
双击该控件会自动注册并生成 监听值变化的事件。
this.m_selectFileMode.SelectedIndexChanged += new System.EventHandler(this.m_fileMode_SelectedIndexChanged);

private void m_fileMode_SelectedIndexChanged(object sender, EventArgs e)
{
    Message.Box("当前选择框的选中值:"+m_selectFileMode.SelectedIndex.ToString() );
    //m_selectFileMode.SelectedIndex 获取或设置指定当前选定项的索引。
}
3.6 TreeView
该控件用于显示树视图。还有很多其他事件及功能大家可查看脚本去根据实际需求使用。自定义绘制TreeView样式请查看
如何实现自定义绘制Winform的TreeView并且实现多选_爱敲代码的小伙计的博客-CSDN博客
/// <summary>
/// 清空树节点
/// </summary>
m_rootTree.Nodes.Clear();

/// <summary>
/// 添加1级树节点
/// </summary>
var childNodeLv1 = m_rootTree.Nodes.Add(key, text);//key:该节点的键(需要保持唯一性,可以通过该键去找到树中的对应节点), text:这个节点上显示的文字
childNodeLv1.Tag = key;// 获取或设置包含有关树中节点的数据的对象。
childNodeLv1.BackColor = Color.Yellow;//设置底板颜色
childNodeLv1.ForeColor = Color.Red;//设置文字颜色
childNodeLv1.Expand();//展开此节点

/// <summary>
/// 移除某节点
/// </summary>
m_rootTree.Nodes.Remove(childNodeLv1);

/// <summary>
/// 添加2级树节点
/// </summary>
var childNodeLv2 = childNodeLv1.Nodes.Add(key, text);

/// <summary>
/// 收起任意节点时的回调
/// </summary>
this.m_rootTree.AfterCollapse += new System.Windows.Forms.TreeViewEventHandler(this.m_rootTree_CollapseAfterSelect);

private void m_rootTree_CollapseAfterSelect(object sender, TreeViewEventArgs e)
{
    MessageBox.Show("有节点收起了!");
    var currNode = e.Node;//获取当前节点
    var state = e.Node.IsExpanded;//获取当前节点展开状态
}

/// <summary>
/// 展开任意节点时的回调
/// </summary>
this.m_rootTree.AfterExpand += new System.Windows.Forms.TreeViewEventHandler(this.m_rootTree_ExpendAfterSelect);

private void m_rootTree_ExpendAfterSelect(object sender, TreeViewEventArgs e)
{
    MessageBox.Show("有节点展开了!");
    var currNode = e.Node;//获取当前节点
    var state = e.Node.IsExpanded;//获取当前节点展开状态
}

/// <summary>
/// 双击任意节点时的回调
/// </summary>
this.m_rootTree.NodeMouseDoubleClick += new System.Windows.Forms.TreeNodeMouseClickEventHandler(this.m_rootTree_DoubleClick);

private void m_srcFileTree_DoubleClick(object sender, TreeNodeMouseClickEventArgs e)
{
    MessageBox.Show("双击某个节点");
    var currNode = e.Node;//获取当前节点
}

/// <summary>
/// 右击任意节点时的回调
/// </summary>
this.m_rootTree.MouseDown += new System.Windows.Forms.MouseEventHandler(this.m_rootTree_MouseDown);

private void m_rootTree_MouseDown(object sender, MouseEventArgs e)
{
    if (e.Button != MouseButtons.Right) return;//如果不是点击的右键,return
    Point clickPoint = new Point(e.X, e.Y);//当前点击坐标
    TreeNode currNode = m_targetFileTree.GetNodeAt(clickPoint);//通过点击坐标获取到当前节点
    if (currNode == null) return;
    currNode.ContextMenuStrip = m_targetMenuTips;//将菜单控件挂给这个树节点
    FillTarMenuTips(currNode);//填充菜单
    m_targetFileTree.SelectedNode = currNode;//将当前节点设置为选中状态
}

/// <summary>
/// 单击任意节点时的回调
/// </summary>
this.m_rootTree.MouseClick += new System.Windows.Forms.MouseEventHandler(this.m_m_rootTree_MouseClick);

private void m_srcMenuTipsMouseClick(object sender, EventArgs e)
{
    m_menuStrip.Close();
}
3.7 ContextMenuStrip
该控件用于显示菜单栏。还有很多其他事件及功能大家可查看脚本去根据实际需求使用。
//代码控制菜单栏,首先需要把菜单栏挂掉对应的控件上。
//以在某个树视图的节点上注册菜单栏为例
TreeNode node = m_rootTree.Nodes.Find("Key1",true);//找到键为"Key1"的节点
node.ContextMenuStrip = m_menuStrip;//将菜单栏绑定到目标节点上

m_menuStrip.Close();//关闭此菜单栏
m_menuStrip.Show();//显示此菜单栏

m_menuStrip.Items.Clear();//清空菜单栏中的选项

var item1 = AddMenuItem("添加菜单1级子节点", m_menuStrip.Items);
var item2 = AddMenuItem("添加菜单2级子节点", item1.DropDownItems);
AddMenuItem("添加菜单3级子节点 1", item2.DropDownItems);
AddMenuItem("添加菜单3级子节点 2", item2.DropDownItems);
AddMenuItem("添加菜单3级子节点 3", item2.DropDownItems);

item1.ForeColor = Color.Red;//设置item文字颜色
item1.BackColor = Color.Yellow;//设置item底板颜色

/// <summary>
/// 添加菜单栏Item
/// </summary>
/// <param name="text ">item上显示的文字</param>
/// <param name="cms">父级item</param>
/// <param name="callBack">添加item点击事件</param>
private ToolStripMenuItem AddMenuItem( string text , ToolStripItemCollection cms , EventHandler callBack = null )
{
    if( !string.IsNullOrEmpty(text) )
    {
        ToolStripMenuItem tsmi = new ToolStripMenuItem(text);
        if (callBack != null) tsmi.Click += callBack;
        cms.Add(tsmi);
        return tsmi;
    }
    return null;
}

/// <summary>
/// 鼠标离开控件时的事件
/// </summary>
this.m_menuStrip.MouseLeave += new System.EventHandler(this.m_menuStripMouseLeave);

private void m_menuStripMouseLeave(object sender, EventArgs e)
{
    m_menuStrip.Close();
}

/// <summary>
/// 鼠标点击控件时的事件
/// </summary>
this.m_menuStrip.MouseClick += new System.Windows.Forms.MouseEventHandler(this.m_menuStripMouseClick);
3.8 BackgroundWorker
BackgroundWorker是进行异步操作的控件。
注意:UI控件不能在异步操作期间去刷新,要在异步执行完后再刷新
public enum AsyncWorkType
{
    FindFile,
    ReplaceFile,
}

//开始执行异步操作
m_asynWorker.RunWorkerAsync(AsyncWorkType.FindFile);//可以传一个参数

//开始执行异步的事件回调
this.m_asynWorker.DoWork += new System.ComponentModel.DoWorkEventHandler(this.m_asynWorker_DoWork);

private void m_asynWorker_DoWork(object sender, DoWorkEventArgs e)
{
    AsyncWorkType _type = (AsyncWorkType)e.Argument;
    if (_type == AsyncWorkType.FindFile)
    {
        for (int i = 0; i < 10; i++)
        {
            Debug.Print("开始异步循环操作" + i.ToString());
            m_asynWorker.ReportProgress(i);//上报进度,上报后会执行m_asynWorker_ProgressChanged回调
        }
    }
}

//异步进度的事件回调
this.m_asynWorker.ProgressChanged += new System.ComponentModel.ProgressChangedEventHandler(this.m_asynWorker_ProgressChanged);

private void m_asynWorker_ProgressChanged(object sender, System.ComponentModel.ProgressChangedEventArgs e)
{
    int currPro = e.ProgressPercentage;//当前进度
    if (currPro > m_progress.Maximum)
        currPro = m_progress.Maximum;
    m_progress.Value = currPro;
    m_loadingText.Text = m_logicIns.CurrStateTips +  Math.Floor(( (double)currPro / m_progress.Maximum) * 100) +"%";
}

//异步执行完成的回调
this.m_asynWorker.RunWorkerCompleted += new System.ComponentModel.RunWorkerCompletedEventHandler(this.m_asynWorker_Complete);

private void m_asynWorker_Complete(object sender, RunWorkerCompletedEventArgs e)
{
    RefreshTreeView();//刷新树视图  (注意:UI控件不能在异步操作期间去刷新,要在异步执行完后再刷新)
}
3.9 ProgressBar
ProgressBar是显示进度条的控件。
m_progress.Maximum = 10;//设置最大进度值
m_progress.Value = 5;//设置当前进度值
3.10 TextBox
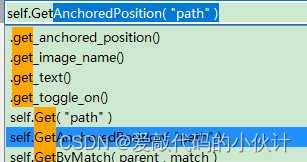
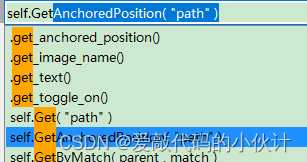
TextBox:文本输入框。可以用来输入路径、密码等内容。也可以自动填充输入内容,如下图
//设置显示文本
m_textBox.Text = "测试";
//自动填充文本段
m_textBox.AutoCompleteCustomSource

m_codeSource.Clear();
for (int i = 0; i < 10; i++)
{
    m_codeSource.Add("自动填充段落" + i.ToString());
}
m_textBox.AutoCompleteCustomSource = m_codeSource;

//注册事件监听文本内容变化
m_textBox.TextChanged+= new System.Windows.Forms.MouseEventHandler(this.m_textBox_TextChanged);

private void m_textBox_TextChanged(object sender, EventArgs e)
{
   Debug.Log("m_textBos最新内容:"+ m_textBox.Text );
}

///以下两个拖动事件,可以配合用来实现拖动文件/文件夹读取到对应路径

//注册事件监听拖动文件进入文本范围
this.m_textBox.DragEnter += new System.Windows.Forms.DragEventHandler(this.m_textBox_DragEnter);

private void m_textBox_DragEnter(object sender, DragEventArgs e)
{
     // 对文件拖拽事件做处理
     if (e.Data.GetDataPresent(DataFormats.FileDrop))
          e.Effect = DragDropEffects.Link;
     else
          e.Effect = DragDropEffects.None;
}
//注册事件监听拖动文件到文本范围中
this.m_textBox.DragDrop += new System.Windows.Forms.DragEventHandler(this.m_textBox_DragDrop);

private void m_textBox_DragDrop(object sender, DragEventArgs e)
{
    var filePath = (string[])e.Data.GetData(DataFormats.FileDrop);
    if (filePath.Length > 0)
    {
        var path = filePath[0];
        Debug.Log("拖拽的文件路径:" +path);
    }
}
3.11 Timer
Timer:计时器
m_timer.Interval = 1000;//(单位:毫秒) 1秒调用一次
m_timer.Start();//开始计时
m_timer.Stop();//停止计时

//注册监听事件,每隔一段时间(Interval)调用一次
this.m_timer.Tick += new System.EventHandler(this.m_timer_Tick);

private void m_timer_Tick(object sender, EventArgs e)
{
    TimeUpdate();
}
3.12 DataGridView
DataGridView:创建网格,类似Excel那种的。这个组件略微复杂,外观样式直接在属性面板设置就可以了
//根据行列索引获取到指定单元格
var obj = m_grid.Rows[rowIndex].Cells[colIndex];
//设置单元格数据
m_grid.Rows[rowIndex].Cells[colIndex].Value = value.ToString();
//设置选中单元格
m_grid.CurrentCell = obj;
//当前活动单元格行索引
m_grid.CurrentCell.RowIndex
//当前活动单元格列索引
m_grid.CurrentCell.ColumnIndex
//聚焦节点
m_grid.Focus();
//获取当前选中行
m_grid.CurrentRow
//行数量
m_grid.Rows.Count
//列数量
m_grid.Columns.Count
//移除某行
m_grid.Rows.Remove(currRow);


//注册事件监听点击单元块
this.m_grid.CellContentClick += new System.Windows.Forms.DataGridViewCellEventHandler(this.m_grid_CellContentClick);

private void m_grid_CellContentClick(object sender, DataGridViewCellEventArgs e)
{
    //e.RowIndex 点击的行索引
    //e.ColumnIndex 点击的列索引
}

//注册事件监听双击单元块
 this.m_grid.CellDoubleClick += new System.Windows.Forms.DataGridViewCellEventHandler(this.m_grid_CellDoubleClick);

private void m_grid_CellDoubleClick(object sender, DataGridViewCellEventArgs e)
{
    //e.RowIndex 点击的行索引
    //e.ColumnIndex 点击的列索引
}

//注册事件监听当前单元格属性改变
this.m_grid.CurrentCellChanged += new System.EventHandler(this.m_grid_CurrentCellChanged);

private void m_grid_CurrentCellChanged(object sender, EventArgs e)
{

}

m_grid.Rows.Clear();
m_grid.Columns.Clear();

///添加第一行表头

DataGridViewTextBoxColumn text = new DataGridViewTextBoxColumn();
text.Name = "模块名";
text.Width = 100;
//只读
text.ReadOnly = true;
//表头对齐方式
text.HeaderCell.Style.Alignment = DataGridViewContentAlignment.MiddleCenter;
//默认单元格对齐方式
text.DefaultCellStyle.Alignment = DataGridViewContentAlignment.MiddleCenter;
m_grid.Columns.Add(text);

DataGridViewCheckBoxColumn tog = new DataGridViewCheckBoxColumn();
tog.Name = "是否运行";
tog.Width = 70;
tog.HeaderCell.Style.Alignment = DataGridViewContentAlignment.MiddleCenter;
m_grid.Columns.Add(tog);

DataGridViewTextBoxColumn result = new DataGridViewTextBoxColumn();
result.Name = "运行结果";
result.Width = 100;
result.HeaderCell.Style.Alignment = DataGridViewContentAlignment.MiddleCenter;
result.ReadOnly = true;
m_grid.Columns.Add(result);

DataGridViewButtonColumn report = new DataGridViewButtonColumn();
report.Name = "查看报告";
report.Width = 100;
report.HeaderCell.Style.Alignment = DataGridViewContentAlignment.MiddleCenter;
m_grid.Columns.Add(report);

///添加第二行内容
DataGridViewRow row = new DataGridViewRow();
DataGridViewTextBoxCell c1 = new DataGridViewTextBoxCell();
c1.Value = "测试";
c1.Style.Alignment = DataGridViewContentAlignment.MiddleLeft;
row.Cells.Add(c1);
DataGridViewCheckBoxCell c2 = new DataGridViewCheckBoxCell();
c2.Value = true;
c2.Style.Alignment = DataGridViewContentAlignment.MiddleCenter;
row.Cells.Add(c2);
DataGridViewTextBoxCell c3 = new DataGridViewTextBoxCell();
c3.Value = "成功";
c3.Style.ForeColor = System.Drawing.Color.Green;
c3.Style.Alignment = DataGridViewContentAlignment.MiddleCenter;
row.Cells.Add(c3);
DataGridViewButtonCell c4 = new DataGridViewButtonCell();
c4.Value = "点击查看";
c4.Style.Alignment = DataGridViewContentAlignment.MiddleCenter;
row.Cells.Add(c4);
m_grid.Rows.Add(row);
上述代码绘制出来的表格如下图
4. 文件操作
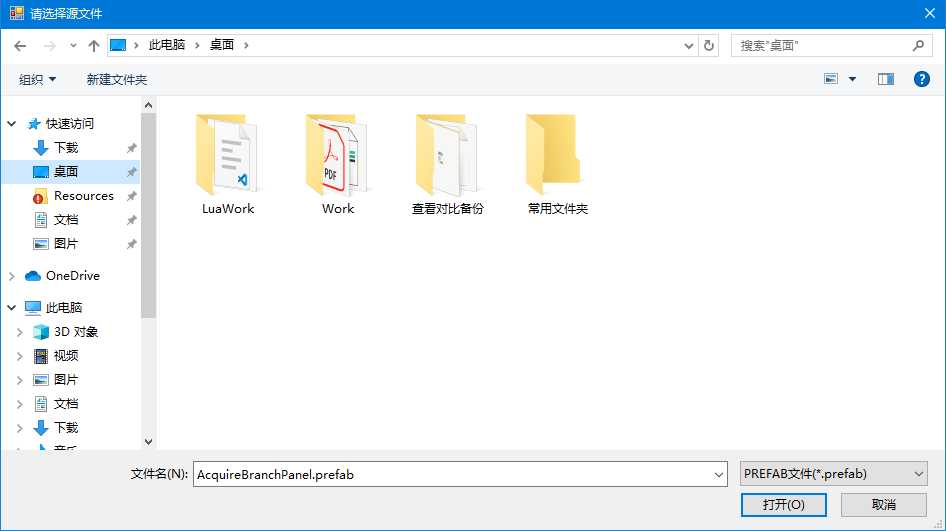
4.1 选择文件弹窗
OpenFileDialog dialog = new OpenFileDialog();
dialog.Multiselect = true;//是否支持多选
dialog.Title = "请选择源文件";//弹窗标题
dialog.Filter = "PREFAB文件(*.prefab)|*.prefab";//可以选择的文件类型,所有类型就是 *.*
string filePath = m_filePath.Text;//文件路径
if( File.Exists( filePath  )) //判断文件是否存在
{
	dialog.InitialDirectory = Path.GetDirectoryName( filePath );//设置默认打开的文件夹路径
}
if ( dialog.ShowDialog() == DialogResult.OK )//点击ok按钮后要执行的事件
{

}
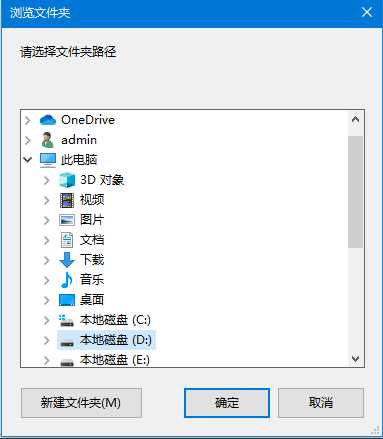
4.2 选择文件夹弹窗
FolderBrowserDialog dialog = new FolderBrowserDialog();
dialog.Description = "请选择文件夹路径";//文件夹描述
dialog.SelectedPath = m_filePath.Text;//默认选中的文件夹路径
if (dialog.ShowDialog() == DialogResult.OK)//点击确定后执行的事件
{

}
5. 界面美化
我用的CSkin库,比较方便,好像DSkin更强但是我没研究过。
使用方法:
1.工程引用CSkin.dll
2.把继承的Form类改为继承CCSkinMain即可
3.引用后属性面板会多出一部分外观设置,去设置对应属性就好了。
下载地址:
CSkin – 官方网站 C#/.Net Winform界面库
接下来我会分享一些常用的文件操作,
C# 常用的文件IO操作_爱敲代码的小伙计的博客-CSDN博客_c# 文件io
下次再见!
免责声明:本站所有文章内容,图片,视频等均是来源于用户投稿和互联网及文摘转载整编而成,不代表本站观点,不承担相关法律责任。其著作权各归其原作者或其出版社所有。如发现本站有涉嫌抄袭侵权/违法违规的内容,侵犯到您的权益,请在线联系站长,一经查实,本站将立刻删除。 本文来自网络,若有侵权,请联系删除,如若转载,请注明出处:https://yundeesoft.com/26056.html

