大家好,欢迎来到IT知识分享网。
作用:
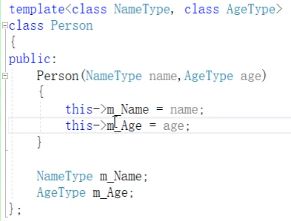
建立一个通用的类,类中成员数据和数据类型可以不具体定制,用一个虚拟的类型来代表:
语法:
其含义与函数模板的语法相同。。
例子:
实例化代码:
类模板和函数模板的区别
1.类模板没有自动类型推导的使用方式
2.类模板在模板参数列表中可以有默认参数(函数模板不能用!)
①关于第一点的例子:
编译器不会给你自动推导类中的数据类型,只能通过自己手动去指定,如:
②关于第二点的例子:
在声明模板的开头,可以这样编写:
这个的函数的含义是:
class AgeType用户不手动指定类型,则使用已经声明好的int类型
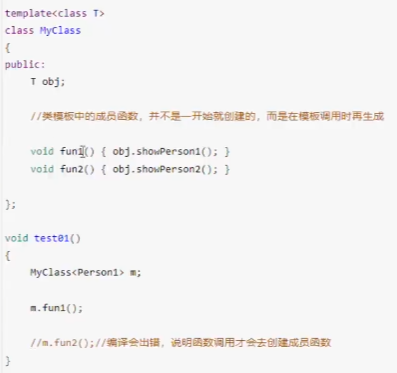
类模板中成员函数创建时机
1.普通类中的成员函数一开始就可以创建
2.类模板中的成员函数在开始调用时才创建
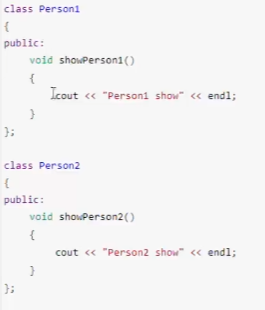
例子:
在编译的时候,编译器不会报错,说明编译过程不会创建这些成员函数(obj.showPerson1和obj.showPerson2)
说明:类模板的成员函数要先调用才会创建。。
类模板对象做函数参数
含义:类模板实例化出的对象,向函数传参的方式
共用三类传入方式:
1.指定传入的类型——直接显示对象的数据类型
2.参数模板化——把对象中的参数变为模板进行传递
3.整个类模板化——把这个对象类型模板化进行传递
 1 #include <iostream>
 2 #include <string>
 3 #include <typeinfo>
 4 using namespace std;
 5
 6 template<class T1, class T2>
 7 class Person{
 8 public:
 9     Person(T1 name, T2 age){
10         this->m_Name = name;
11         this->m_Age = age;
12     }
13
14     void showPerson(){
15         cout << "名字:" << this->m_Name << " 年龄:" << this->m_Age << endl;
16     }
17
18     T1 m_Name;
19     T2 m_Age;
20 };
21
22 //1.指定传入类型(常用)
23 void printPerson1(Person<string,int> &p){
24     p.showPerson();
25 }
26
27 void test01(){
28     Person<string,int> p ("我",100);
29     printPerson1(p);
30 }
31
32 //2.参数模板化
33 template<class T1, class T2>
34 void printPerson2(Person<T1,T2> &p){
35     cout << "T1的类型是:" << typeid(T1).name() << endl;
36     cout << "T2的类型是:" << typeid(T2).name() << endl;
37     p.showPerson();
38     //typeid用来获取一个表达式的类型信息。
39     //对于基本类型(int、float 等C++内置类型)的数据,类型信息所包含的内容比较简单,主要是指数据的类型。
40     //对于类类型的数据(也就是对象),类型信息是指对象所属的类、所包含的成员、所在的继承关系等。
41 }
42
43 void test02(){
44     Person<string,int> p ("你",10);
45     printPerson2(p);
46 }
47
48 //3.整个类模板化
49 template<class T>
50 void printPerson3(T &p){
51     p.showPerson();
52     cout << "T的类型是:" << typeid(T).name() << endl;
53 }
54
55 void test03(){
56     Person<string,int> p ("他",150);
57     printPerson3(p);
58 }
59
60 int main(){
61     //test01();
62     //test02();
63     test03();
64     system("pause");
65     return 0;
66 }
类模板与继承
注意:
1.当子类继承的父类是一个类模板时,子类在声明的时候,要指定出父类中T的类型
2.如果不指定,编译器无法给子类分配内存
3.如果想灵活指定出父类中T的类型,子类也需变为类模板
 1 #include <iostream>
 2
 3 using namespace std;
 4
 5 template<class T>
 6 class Base{
 7     T m;
 8 };
 9
10 //class Son: public Base{};    错误,缺少类模板Base的参数列表,编译器算不出来你这个类要占多大的内存
11 class Son: public Base<int>{    //Base<int>告诉编译器子类继承的是父类的int类型
12
13 };
14
15 //若要灵活指定父类中T的类型,子类也需要变成类模板
16 template<class T1,class T2> //T1指向下列子类模板的类型,T2指向此子类继承的父类模板的类型
17 class Son2:public Base<T2>{
18 public:
19     Son2(){
20         cout << "T1的类型是:" << typeid(T1).name() << endl;
21         cout << "T2的类型是:" << typeid(T2).name() << endl;
22     }
23     T1 obj;
24 };
25
26 void test(){
27     Son2<int,char>S;
28     //int传给了T1,说明obj是一个int型,char传给了T2,又由T2传给T,确定了父类类型为char
29 }
30
31 int main(){
32     test();
33     system("pause");
34     return 0;
35 }
类模板成员函数类外实现
例子:
 1 #include <iostream>
 2
 3 using namespace std;
 4
 5 template<class T1, class T2>
 6 class Person{
 7 public:
 8     //类内实现
 9     // Person(T1 name, T2 age){
10     //     this->mName = name;
11     //     this->mAge = age;
12     // }
13
14     // void showPerson(){
15     //     cout << "name:" << this->mName << endl;
16     //     cout << "age:" << this->mAge << endl;
17     // }
18
19     //类外实现
20     Person(T1 name, T2 age);
21     void showPerson();
22
23     T1 mName;
24     T2 mAge;
25 };
26
27 //构造函数的类外实现
28 template<class T1, class T2>
29 Person<T1,T2>::Person(T1 name, T2 age){
30     this->mName = name;
31     this->mAge = age;
32 }
33
34 //成员函数的类外实现
35 template<class T1, class T2>
36 void Person<T1,T2>::showPerson(){
37     cout << "name:" << this->mName << endl;
38     cout << "age:" << this->mAge << endl;
39 }
40
41 void test(){
42     Person<string, int>S("Tom",20);
43     S.showPerson();
44 }
45
46 int main(){
47     test();
48     system("pause");
49     return 0;
50 }
类模板分文件编写
问题:由于类模板中成员函数创建的时机是在调用阶段,在分开写文件的时候链接不到(编译报错)
例子:
①Person.H文件
 1 #ifndef __Person_H__
 2 #define __Person_H__
 3
 4 #endif
 5 #include <iostream>
 6 using namespace std;
 7
 8 template<class T1, class T2>
 9 class Person{
10 public:
11     Person(T1 name, T2 age);
12
13     void showPerson();
14
15     T1 mName;
16     T2 mAge;
17 };
②Person.cpp文件
 1 #include "Person.h"
 2
 3 template<class T1, class T2>
 4 Person<T1,T2>::Person(T1 name, T2 age){
 5     this->mName = name;
 6     this->mAge = age;
 7 }
 8
 9 template<class T1, class T2>
10 void Person<T1,T2>::showPerson(){
11     cout << "name:" << this->mName << endl;
12     cout << "age:" << this->mAge << endl;
13 }
③Person.hpp文件
 1 #ifndef __Person_HPP__
 2 #define __Person_HPP__
 3
 4 #endif
 5 #include <iostream>
 6 using namespace std;
 7
 8 template<class T1, class T2>
 9 class Person{
10 public:
11     Person(T1 name, T2 age);
12
13     void showPerson();
14
15     T1 mName;
16     T2 mAge;
17 };
18
19 template<class T1, class T2>
20 Person<T1,T2>::Person(T1 name, T2 age){
21     this->mName = name;
22     this->mAge = age;
23 }
24
25 template<class T1, class T2>
26 void Person<T1,T2>::showPerson(){
27     cout << "name:" << this->mName << endl;
28     cout << "age:" << this->mAge << endl;
29 }
④(主函数内调用)usePerson.cpp文件
 1 #include<iostream>
 2 using namespace std;
 3
 4 //第一种解决方式:直接包含源文件(少用)
 5 //#include "Person.hpp"   //只用这条,会报错,
 6 //#include "Person.cpp"   //解决方法1,只用这条,可以运行
 7
 8 /*类模板中的成员函数是不会一开始就创建的,当只包含include "Person.hpp"时候,编译器只看到了
 9 头文件里面写的声明,不会去具体实现生成声明中的两个函数 Person<string,int> P("Tom",23);和P.showPerson();
10 所以只靠#include "Person.hpp"是链接不到类模板的
11 */
12 /*但当你使用#include "Person.cpp"时候,编译器会去看你Person.cpp文件的内容,其中也cpp文件内也引用了相应的头文件
13 因此只靠这条是可以顺利运行代码的*/
14
15
16 //第二种解决方法:把.h和.cpp的内容写一起,组成.hpp文件
17 #include "Person.hpp"
18
19 void test(){
20     Person<string,int> P("Tom",23);
21     P.showPerson();
22 }
23
24 int main(){
25     test();
26     system("pause");
27     return 0;
28 }
类模板与友元
1.全局函数类内实现,直接在类内声明友元即可
2.全局函数类外实现,需要提前让编译器知道全局函数的存在(复杂)
例子:
 1 #include <iostream>
 2
 3 using namespace std;
 4
 5 //2.类外实现
 6 template<class T1,class T2>
 7 class Person;   //提前让编译器知道Person类的存在
 8
 9 template<class T1,class T2>
10 void printPerson2(Person<T1,T2>p){
11     cout << "name:" << p.mName << "  age:" << p.mAge << endl;
12 }
13 /////
14
15 template<class T1, class T2>
16 class Person{
17     //全局函数打印Person信息
18     //全局函数,类内实现
19     // friend void printPerson(Person<T1,T2>p){
20     //     cout << "name:" << p.mName << "  age:" << p.mAge << endl;
21     // }
22
23     //全局函数,类外实现
24     // friend void printPerson2(Person<T1,T2>p);   //这是普通函数声明,类外实现是模板函数,说明类外的模板函数并没有被声明
25     friend void printPerson2<>(Person<T1,T2>p);     //告知编译器这是声明模板函数
26     //同时还要进行一步:把类外实现的函数放到这个类的上方,同时要声明要调用的类
27
28 public:
29     Person(T1 name, T2 age){
30         this->mAge = age;
31         this->mName = name;
32     }
33
34 private:
35     T1 mName;
36     T2 mAge;
37 };
38
39 //1.全局函数在类内实现
40 // void test01(){
41 //     Person<string,int>p("Tom",25);
42 //     printPerson(p);
43 // }
44
45
46 //全局函数在类内实现
47 void test02(){
48     Person<string,int>s("woo",20);
49     printPerson2(s);
50 }
51
52 int main(){
53     //test01();
54     test02();
55     system("pause");
56     return 0;
57 }
免责声明:本站所有文章内容,图片,视频等均是来源于用户投稿和互联网及文摘转载整编而成,不代表本站观点,不承担相关法律责任。其著作权各归其原作者或其出版社所有。如发现本站有涉嫌抄袭侵权/违法违规的内容,侵犯到您的权益,请在线联系站长,一经查实,本站将立刻删除。 本文来自网络,若有侵权,请联系删除,如若转载,请注明出处:https://yundeesoft.com/30886.html


